Thursday, May 16, 2013

Step Back and Admire Your (Almost) Completed Hull

I was able to get on the water Sunday. Jim just bought a used 18' US Yachts keelboat that he wants to use for the club. I helped where I could to get it ready for the sail. So much work had to be done to get ready. It was a good 45 minutes before we could launch, and this is with a very experienced skipper (Jim). Upgrades to some of the hardware would help, as would a working centerboard (it seemed to be jammed in the up position) and better cockpit drains. But as a club boat, it'll work great, though I know Jim is eager to finish his other project and get on the water with his own vessel soon.

Shakedown sail of Jim's new used boat Sunday afternoon. It is an 18' US Yachts racer. Once again, I am impressed by how well PocketShip measures up to other boats in its class.
Since Sunday, it's been a bit of a whirlwind. I had to leave for Chicago for a couple days, which of course bit into boatbuilding time. I can't complain much. Chicago is one of my favorite U.S. cities. It's like Minneapolis, but much more interesting, with good public transportation, and vastly more cosmopolitan

Sailing, too, is a part of the culture. There are yacht clubs at the marinas downtown, not far from where I was staying. The view from my hotel over Lake Michigan was therefore summarily stunning. I could spy sails cruising back and forth along the coast. I later found that J/22's and J/24's can be rented for $55 an hour, which is a pretty good deal given what you get. Thirty-plus footers can be chartered for double the price (which seats 10 of your best friends). And 5-hour sunset cruises across the lake would be $135 (but that's only one way). No word on how much the taxi costs to get back.

A lonely sail up and down the coast.
Two Chicago Police boats approach a fishing dinghy. Don't know what the guy did, but I hope he had a head on board.
While in Chicago, I had plenty of time to consider next steps. When I left, I'd just re-glued the point of the keelson back down and stitched the aft 2/3 of the bilge and side panels on. Wait, what was that? Re-glued the point of the keelson? Oh yes. Literally 10 minutes after an email from Chris warned me that the keelson point can be tripped over and thus broken, I was sanding down some of the keelson squeeze out when I caught the point under the vacuum tube. I didn't even realize it was broken until I was done with the sanding. There it was, pointing 90 degrees straight up. My heart sank; curses flew.
Keelson point snapped. Vacuum hose behind was the culprit.

Luckily, it was a clean break. I mixed up some thickened epoxy, aligned the break points, and fastened it with a drywall screw. I then let it cure over the next day, pulled the screw out, and incredibly, it was fixed. I carefully tried to assess the strength, finally slipping underneath and lifting the entire front half of the boat, crate and all, right where it was broken just a day before. Amazing! Chris wrote me after the fix and suggested much of the same except with an additional layer of 'glass. That would've been a good idea, but it turns out it wasn't needed.

Keelson point after glue up and sanding. Stronger than it was before. I <3 epoxy.
I am convinced boatbuilding is a series of high-highs, low-lows, and many peaks and valleys in between victory and defeat. What seems like a catastrophe may not really be, especially if there's enough sandpaper and epoxy at hand. What seems like a major accomplishment is actually just the end of one chapter and the beginning of another. Life and stitching go on.

Stitching is something every boatbuilder at one point or another will experience. It's tough business. However, thanks to the hand ratcheting I did while building the crate, my hands and wrists are in good shape. I found it much easier to take two pliers and work them like a surgeon. One plier holds one wire, and the other crosses, then twists around. Gripping near the base and a good few turns brings the stitch up close and provides the strength to carry on. I also found that keeping the wires flat on the opposite end of the twist helps.

First stitches go in. The container holds the 18g wire. Flattening these rounded wires helps tie these better.
First side panel stitches go on. The keelson is actually broken here but I went ahead and stitched the aft 2/3 anyway.

Took a break for lunch after doing the port side panel. I moved the bike to the backyard right after this photo.
Clamps hold the side panels in place.
Close up of side-bilge panel stitches.

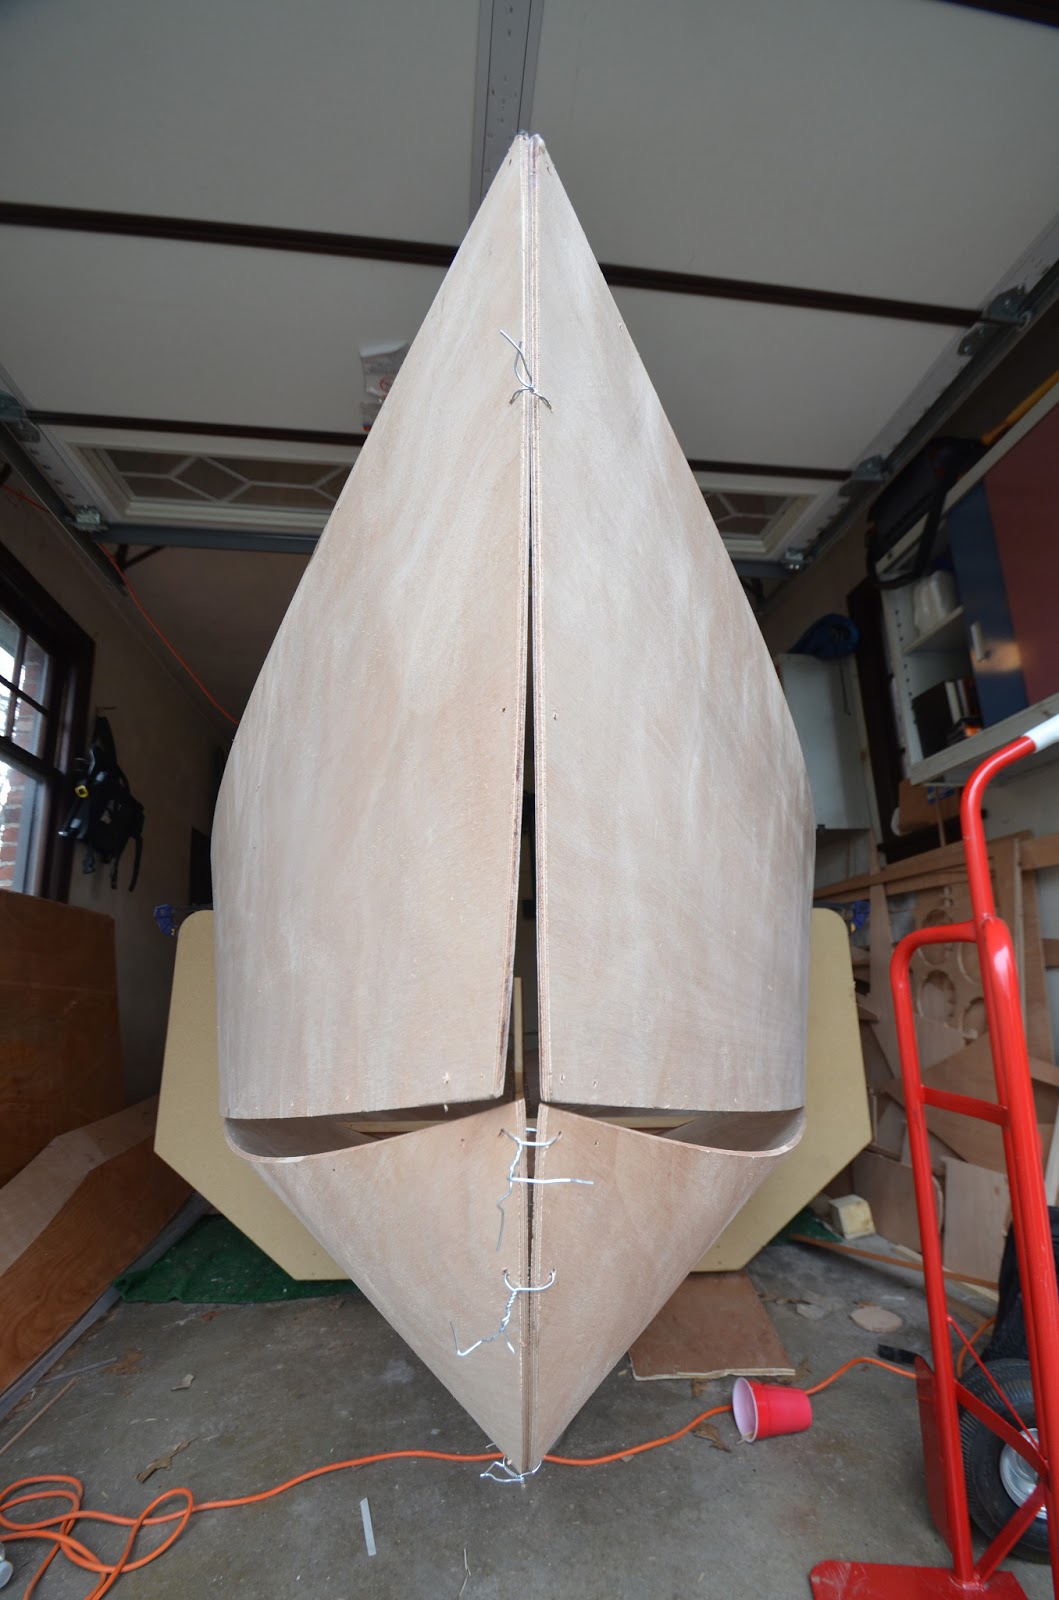
After the keelson was fixed, I was able to finish out the bow. This was a major tussle and required the strongest hands I know: My wife. Seriously. Her fingers are incredibly strong for her size; she's the one in the family that opens up the peanut butter jars. This was no problem for her. As she squeezed the bow together, I stitched, furiously trying to keep them close. All but the very top 1/2" inch touches "inside corner to inside" corner. With a smalll shim, I'm able to get the top 1/2" to about 1/8" together. Good enough, I say.

Before installing the shim you can see where work is needed. The single stitch is actually my "key" that closes up the bow so I can shut the garage door.
View of work to be done. Also notice the unfinished centerboard and the 'glassed top panels. I'll need to move these out as they're just in the way right now.
Both side panels stitched. Floor 4 is also stitched.
Pressing on, I decided to install the floors. It takes contortionist skills to get to some of these areas. This is why I decided to wait before stitching the side panel together at the bow, so that I can have an easier time accessing the holes for the forward floors and bulkheads. The benefit to stitching the hull together first is that the proper shape can take place. I found, though, that the floors wanted to push the hull panels out, meaning it was faster to place the floors and then the hull around it. In hindsight, I don't know how I would've been able to stitch these with the bow together. Otherwise, I would've been hanging in the boat, risking life, limb, and plywood in the process.

Floors and bulkheads go in. Floor 8 and the transom have yet to be installed.

These cleats in bulkheads 1 and 2 need to be beveled for the hull shape. I haven't pulled the side panels down at this part of the hull yet which is why the panel isn't flush with bulkhead 1.
I finally finished bulkhead 8 last night. Just waiting for the final layer of epoxy to settle, then a quick sanding before the install. I'm not sure I'll be able to do the transom tonight (it, too, requires some beveling) and I want to be sure I get a good fit in this critical component. My goal was to have the hull assembly stitched before Okoumefest so that, upon return, I could begin the fillets and 'glassing. That may have to wait a little bit but at least I'll have enough of a story to tell to fellow builders in Maryland.

Saturday, May 11, 2013

Crate and Bottle

One of the more intriguing parts of the manual is how flippant it can be about certain parts of the build. For example, there's one photo and a few words on building the crate. Make sure S is towards the back and B is towards the front. OK, that's not so bad, and maybe if one wanted to simply assemble the crate as described to sit immobile on a concrete garage floor, that might be enough. But I'm adding wheels! And so what should've been a 90 minute project, tops, turned into a two day excursion with multiple trips to Menards, a few dead screws, and wrists that can now break iron.

As faithful readers will note, I had a mild anxiety attack when the kit was delivered and I realized I was indeed on my way to building a 16 foot boat in my 17 foot garage. I'd carefully measured all ways to Sunday to ensure it would fit, knowing then, as I know now, that it wouldn't be possible without being able to push the crate around to get those last few inches. Chris gave me his casters, saving me the trip to source them, and adding to the metaphysical karmic world that I, too, will pass these casters on to a fellow PocketShip builder.

The parts themselves are CNC cut from fiberboard, which is a material I admit I wouldn't have chosen myself if I were to build this from scratch. In my experience, fiberboard is brittle, sensitive to water, and difficult to fasten. The idea it could support an 800 pound hull with all of its assorted gear (plus me) in a work environment - epoxy, soda cans, humidity - made me nervous. All of those biases proved true as my first attempt to assemble the parts failed miserably. The second attempt (with more robust fasteners) was successful but its performance is TBD. The fact that PocketShips all over the world are shipped with this as the crate doesn't ease my anxiety.

This couldn't be built in my garage, so rather than subjecting my neighbors to me struggling with 50 pounds of fiberboard, I built it in the backyard. Wind gusts topping 40mph made for an interesting experience. In fact, there was a sail scheduled today with the club that was cancelled due to the wind, which is unfortunate because my last two sails had more than enough dead calm for a long while. Not today. As I write this, it sounds like planes are flying overhead, but it's the wind against the house.

I first drilled some pilot holes through the crate and used those as guide holes to continue into the 2x4. The champion fasteners were 5/8" diameter lag screws (1/2" tops) with a lock nut. I didn't have a drill bit that fit so I used a ratchet, many times. As an aside, I'm now qualified to join the professional arm wrestling circuit. To the frame, I added the casters Chris gave me and behold, I had a crate with wheelies.

The frame comes together. A broom marks the centerline. The PocketShip pallet sits against the house. It will become a vegetable planter.

Casters get added. Blue marks the drill.
I dragged it through the backyard and left it in the driveway so that I could clear the panels and other shop equipment from the garage. When done, thinking it would be quite cool to see an upright keel, I couldn't help but drop the keel in place. This was a struggle: lifting the keel high enough to clear the height of the crate without damaging anything, especially myself, took a lot of effort. Care should be taken to ensure the centerboard trunk fits exactly between the two crate panels. With a small thud, given the weight of the keel, it slid quite snugly into the slots. I then set the bilge and side panels in the crate. For a moment, it looked like a boat! Holy cow, that thing's big. But it fits in the garage, like a ship in a bottle, and that's the most important thing.

The downside is I've now lost my flat, smooth surface for the larger pieces, such as final prep for the side panels. I actually finished these a couple nights ago and set them aside. Each side panel took about 2.5 hours to sand and maybe 10 circles of 120 grit paper. To extrapolate that, the bilge panels are at least 50% of that area. Call it 4 hours per bilge panel, 2.5 per side panel, and 1.5 for each topside. That means the total sanding effort, straight through, is about 16 hours. That ties nicely with other bloggers but doesn't count my, let's say, slightly more robust sanding requirements in the poor epoxy areas. Nor does it count sanding the keel. And of course that's only to 120; "bright" areas will need to go to 220 and in the case of the centerboard, it's up to 400. Mental fortitude is a requirement for this boat, which I have, but only within certain limits.

Sanding the nights away. Half way done with this half.
To that end, sanding must have music else it's unbearable. The mind wanders into strange territories, as has been described elsewhere. My mind is especially prone to oddity which is why I need to keep myself mentally occupied. I am thinking of switching from Pandora to podcasts. If anyone has a recommendation, send me a note in the comments section or via email.

alien-vs-predator2
Where your mind can wander while sanding. Believe me when I say this is only the beginning...
I also spent a couple nights this week fixing the busted bilge panel. Chris lent me his heat gun - a power hair dryer, if I ever saw one - that softened the epoxy enough that a tug separated the joints. I was relieved when I didn't set the epoxy, wood, or myself on fire. These had to be once again sanded smooth to remove the epoxy in preparation for a refit. It took a long time, but the refit worked well.
 
Finger joints separated and sanded back down. These were "scarfed" back together later that evening.
I oversanded some of the tops of the joints so it will need some filler but I'm pleased with the result. When this is 'glassed and painted, it'll look smooth as butter. I still have to sand the inside face, but that won't take too long. I've also decided to wait for the flip to fix the outside face, which just needs a good sanding and some filler, and something I'll be doing throughout the hull before final 'glassing, anyway, not just that panel. Part of that decision is due to the fact I have no room in the garage anymore. The more important driver of the decision is that I don't need a smooth outside hull to stitch that panel together, and I'm itching to start stitching.

A tight fit in the garage. I'll be working like this often. The keel looks perky, though.
Panels fit nicely. It was a thrill to see this!
The mailman was delivering the latest catalog of something as I was clearing the garage and stopped to ask me what it was. I said it's a boat I'm building. He goes, you are good with wood, and continued on his journey. There was just an assumption there about being 'good with wood' that puzzled me, and still does. It was actually the second time today that I was complimented on my woodworking (one with evidence, one without). They obviously hadn't seen me pulling apart the first finger joints on the bilge panels.

The neighbor pulled up with a large used pontoon they'd just acquired for a steal. The father of one of the neighbors is a king woodworker. He did their fireplace mantle and also the window panes in our house (our windows are nearly 100 years old and very unstable). By any definition, he is a craftsman. So I showed him the rudder and the boom gallows and the tiller I made from laminated padauk and ash. He said they were terrific and was impressed. Now, a compliment from the mailman I can dismiss. A compliment from a salty dog like that made me blush.

Though time will tell if the thing actually floats, not to mention how it turns into the wind, heels, and tracks. That's a long way away, but I'll take the small victories as I get them. Off to Chicago for a couple days on a business trip, then a couple nights home, then a visit to CLC for Okoumefest. While the boat will have to wait, I can't complain about where I'm headed.

Monday, May 6, 2013

The First Sea Stories

Mother Nature finally succumbed to my threats and let loose the spring she always had just behind the curtain. Saturday was in the 40's and cloudy, but the late afternoon saw glimmers of hope as the sky began to clear. Sunday seemed to be more of the same with morning clouds that gave way to a remarkable afternoon. Sunday was also the first time in Minnesota I was able to get on a sailboat, a 30 foot sloop out of Lake Pepin, since last year and as luck would have it, not the only time I was able to sail this week.

At the bow. Or, how I spent my Sunday afternoon.
She's a beauty.
Since, however, this is a PocketShip blog, I'll talk about tonight's excursion with Chris aboard his Chucky B. I met him at his house for the season's shakedown sail, which included a rudder fix, re-rigging, a new extended gaff, and a cabin remodel. We headed over the boat dock at Waconia, dipped the boat in the water, and moored to the dock as Chris started stepping the mast getting ready for the ride. I did my best to help but it was obvious help wasn't needed so I took in the process hoping I'd remember for next time.

My wife joined us just as the main was raised so we motored in to pick her up. The fourth member of our crew was not able to join. Also not able to join was the wind. Alas, the wind was not with us as a dead calm settled over the lake. Disappointed, we fired up the Lehr propane outboard and headed for a circumnavigation of Coney Island. No, not that one.

Lake Waconia

In the old days, Chris explained, the trolley cars of Minneapolis ended their run at Waconia. In an effort to keep people there, someone decided to build an amusement park in the middle of the lake. Hence, the name Coney Island after the New York City icon. No word if Nathan's set up shop there, too.

At the point of the island. This had 18 inches of ice just last week.
We cut the motor and sat idle for a bit, chatting the afternoon away, hoping for the puff of wind that never came. No matter. Being out on a boat as the sun set, comerans diving out of the trees, fish jumping from the water, was a spectacular way to spend a couple hours.

Skipper and his crew (me).
It gave me a chance to really give the boat a workout. I was up on the toerails, in the anchor well, lying down in the cabin, moving my feet from port to starboard. I couldn't NOT be comfortable on this boat. It's remarkable, really. I spent Sunday afternoon on a 30 foot sloop. In all seriousness, this is a more comfortable boat. By far. Sure, I could use the head on the sloop while standing up but that's about the only real advantage.

I came home tonight with every intention to work on the centerboard and finish up the final layer of epoxy on the topside panels. But I wrote this blog tonight and I have to be at an early meeting tomorrow, so that will have to wait. With the weather better, I don't feel the urgency to work on the boat as I did before - I want to be out! That'll go away once I get used to the warm weather again. Thanks, Chris, for an awesome sail.
 
The Lehr propane motor. We used less than a bottle for the 2.5 hours.
A view up the mast. This was scarfed from 2 8 foot planks.
Chris, the Skipper/Builder, and my wife.
View over the port side.
View towards the bow as the sun set.
One of the better sunsets I can remember.
Settling in the cabin. Nav lights were on.
Running lines as we motored in.
Chucky B at sunset.